- Published on
Learn Solidity by Build Wave Portal
Hi there! 👋
Two months ago, I started the #100DaysOfCode challenge for refreshing my coding skills and learning new things about Web3. I have never worked with Web3 related before; I just read about the articles.
After I spent some time reading many tutorials and courses, I think I should build a demo app or mini-project and teach others by creating the tutorial that will better understand.
Currently, I fell in love with Web3/Blockchain world even though I just started to learn Solidity for only one month, and every day when I woke up, I knew I had so many things to learn, it's a nice feeling, I hope some of you have the same feeling as me :)
Wave Portal website that I built when I finished the Buildspace course below: 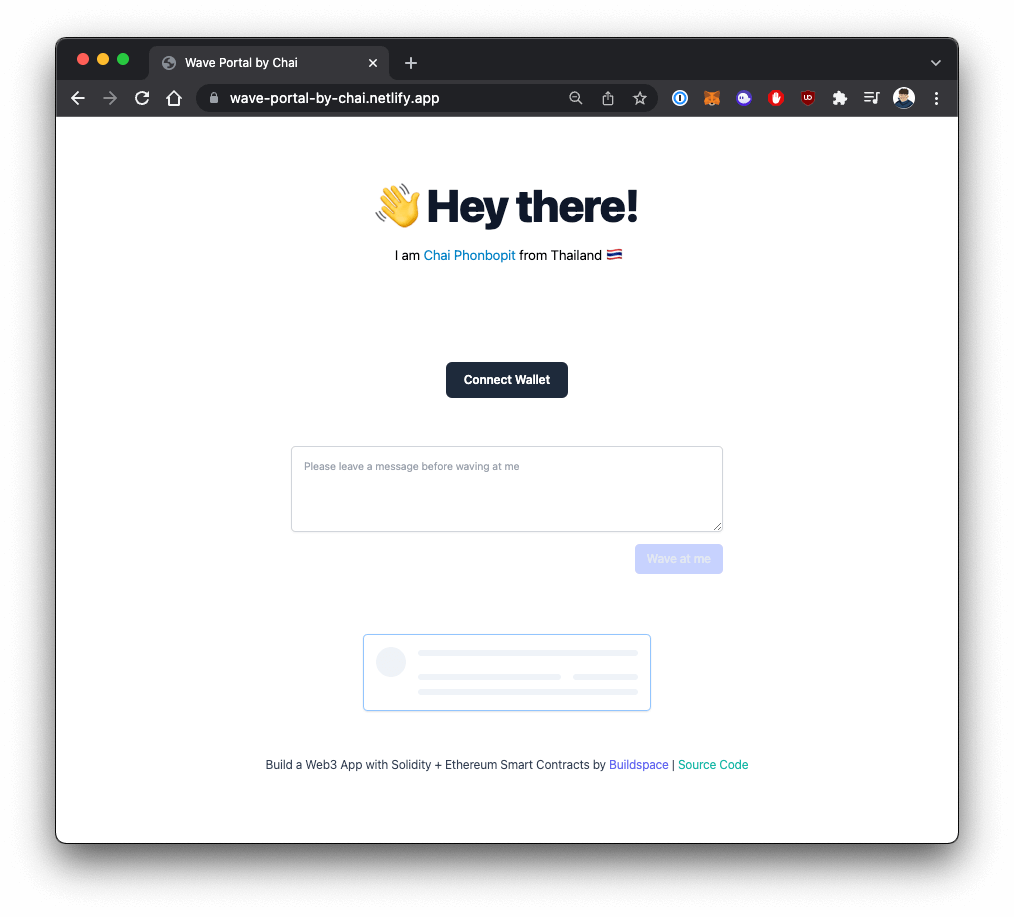
Source Code : Link
Step 1 - Setup Project
Create a project named wave-portal and initialize with npm init and then install hardhat with:
mkdir wave-portal
cd wave-portal
npm init -y
npm install hardhat --save-dev
Then initial project with hardhat configuration:
npx hardhat
Select Create a sample project and follow the instruction.
888 888 888 888 888
888 888 888 888 888
888 888 888 888 888
8888888888 8888b. 888d888 .d88888 88888b. 8888b. 888888
888 888 "88b 888P" d88" 888 888 "88b "88b 888
888 888 .d888888 888 888 888 888 888 .d888888 888
888 888 888 888 888 Y88b 888 888 888 888 888 Y88b.
888 888 "Y888888 888 "Y88888 888 888 "Y888888 "Y888
👷 Welcome to Hardhat v2.8.4 👷
✔ What do you want to do? · Create a basic sample project
✔ Hardhat project root: · <enter>
✔ Do you want to add a .gitignore? (Y/n) · y
✔ Do you want to install this sample project's dependencies ... · y
In case you don't install dependencies or missed them, you can install them with:
npm install --save-dev @nomiclabs/hardhat-waffle ethereum-waffle chai @nomiclabs/hardhat-ethers ethers
Learn more about Hardhat - Read this : Getting Started Hardhat
To make sure everything is working, run this command:
npx hardhat compile
You will see the result:
Downloading compiler 0.8.4
Compiling 2 files with 0.8.4
Solidity compilation finished successfully
and try to run a test script:
npx hardhat test
You should see something like this:
  Greeter
Deploying a Greeter with greeting: Hello, world!
Changing greeting from 'Hello, world!' to 'Hola, mundo!'
    ✓ Should return the new greeting once it's changed (398ms)


  1 passing (399ms)
If you go to the file hardhat.config.js, you will see the configuration with set solidity compiler to version 0.8.4 the same as a result above
module.exports = {
  solidity: "0.8.4",
};
Step 2 - Create Wave Portal Contract.
Create a WavePortal contract.
// SPDX-License-Identifier: UNLICENSED

pragma solidity ^0.8.0;

import "hardhat/console.sol";

contract WavePortal {
    uint256 totalWaves;
    string[] private waves;

    constructor() {
        console.log("WavePortal");
    }

    function wave(string memory _message) public {
        // TODO
    }

    function getAllWaves() public view returns (string[] memory) {
        return waves;
    }

    function getTotalWaves() public view returns (uint256) {
        console.log("We have %d total waves!", totalWaves);
        return totalWaves;
    }
}
We have 3 functions:
wave()- to wave and insert new data intowavesarray variable.getAllWaves()- return all waves.getTotalWaves()- return a number of waves.
Create a script to testing deploy a contract, new file named: scripts/run.js
const main = async () => {
  const WavePortal = await hre.ethers.getContractFactory('WavePortal');
  const wavePortal = await WavePortal.deploy();
  await wavePortal.deployed();
  console.log('Contract deployed to:', wavePortal.address);
};

main()
  .then(() => {
    process.exit(0);
  })
  .catch((error) => {
    console.log(error);
    process.exit(1);
  });
and then run a script:
npx hardhat run scripts/run.js
The result will be something like this:
Compiled 3 Solidity files successfully
WavePortal
Contract deployed to: 0x5FbDB2315678afecb367f032d93F642f64180aa3
hreis the Hardhat Runtime Environment. It's a global variable that you can access when you run with a prefixnpx hardhat <COMMAND>
Step 3 - Test & Deploy to Testnet
Try to call function to get total waves and all waves, edit run.js file:
const main = async () => {
  const WavePortal = await hre.ethers.getContractFactory('WavePortal');
  const wavePortal = await WavePortal.deploy();
  await wavePortal.deployed();
  console.log('Contract deployed to:', wavePortal.address);

  const totalWaves = await wavePortal.getTotalWaves();
  console.log('totalWaves : ', totalWaves);

  const waves = await wavePortal.getAllWaves();
  console.log('getAllWaves : ', waves);
};

main()
  .then(() => {
    process.exit(0);
  })
  .catch((error) => {
    console.log(error);
    process.exit(1);
  });
and run again
npx hardhat run scripts/run.js
You will see the result like this:
WavePortal
Contract deployed to: 0x5FbDB2315678afecb367f032d93F642f64180aa3
We have 0 total waves!
totalWaves :  BigNumber { value: "0" }
getAllWaves :  []
It's actually working! We can deploy to localhost, and next step we are going to deploy to testnet,
Now, we will create new file named deploy.js for deployment only. (for the logic test we can use run.js or use tests folder.)
const main = async () => {
  const WavePortal = await hre.ethers.getContractFactory('WavePortal');
  const wavePortal = await WavePortal.deploy();
  const tx = await wavePortal.deployed();
  console.log('Contract deployed to:', wavePortal.address);
  console.log('Contract deployed tx:', tx.deployTransaction.hash);
};

main()
  .then(() => {
    process.exit(0);
  })
  .catch((error) => {
    console.log(error);
    process.exit(1);
  });
If you prefer, you can create two separate scripts files : 1. for deployment and 2. for test some functionality
Now time to deploy to testnet. When you deploy something on the blockchain, you will need a node (machine) to run your smart contract. There are two options:
- Have your own Ethereum Node.
- Use a third-party Ethereum Node Provider.
In this case, we will use Alchemy as Testnet Node.
Go to Alchemy and create your account.
Create App with Testnet as below:


Once you are already created it, go to the app and click on VIEW KEY, then copy the HTTP Endpoint


Save to the .env file:
ALCHEMY_API_URL=<YOUR_HTTP_ENDPOINT>
And don't forget to add .env to a .gitignore file.
Another Ethereum Node Privder if you like : Infura, Quicknode, GetBlock and Moralis
Now Install Metamask, Create a new wallet and export your private key.
For development, it's best practice to use a Metamask that isn't associated with any real money. And you can create a new browser profile (on Chrome, Brave or Microsoft Edge), install Metamask and create a new wallet.
Get your private key. You have to open Metamask and then export a private key, copy that to save in .env
Account Detail -> Export Private Key
then install dot-env:
npm install dot-env --save-dev
update your .env:
ALCHEMY_API_URL=<YOUR_HTTP_ENDPOINT>
ACCOUNT_PRIVATE_KEY=<YOUR_PRIVATE_KEY>
and then update hardhat.config.js with this:
require('@nomiclabs/hardhat-waffle');

+ const dotenv = require('dotenv');
+ dotenv.config();

// This is a sample Hardhat task. To learn how to create your own go to
// https://hardhat.org/guides/create-task.html
task('accounts', 'Prints the list of accounts', async (taskArgs, hre) => {
  const accounts = await hre.ethers.getSigners();

  for (const account of accounts) {
    console.log(account.address);
  }
});

// You need to export an object to set up your config
// Go to https://hardhat.org/config/ to learn more

/**
 * @type import('hardhat/config').HardhatUserConfig
 */
module.exports = {
  solidity: '0.8.4',
+   networks: {
+     rinkeby: {
+       url: process.env.ALCHEMY_API_URL,
+       accounts: [process.env.ACCOUNT_PRIVATE_KEY]
+     }
+   }
};
Then it would be best if you got free ETH testnet (rinkeby) for deploy on a testnet:
| Name | Link |
|---|---|
| Official Rinkeby | https://faucet.rinkeby.io/ |
| Chainlink | https://faucets.chain.link/rinkeby |
In the official Rinkeby, just paste your wallet address, and then share on a social (Facebook, Twitter) with a public link. You will get free ETH for a rinkeby testnet.
Now, we meet the three requirements:
- ✅ Ethereum Node (We use Alchemy)
- ✅ Account to deploy smart contract (Deployer)
- ✅ Account must have ETH to pay a gas fee when deploying a contract.
After you have some ETH, then run the same command but use the option --network rinkeby
npx hardhat run scripts/deploy.js --network rinkeby
Then you will see the result like:
Contract deployed to: 0x681619361C193A34eaA448B067B7b5286e571C0F
Contract deployed tx: 0x6792ffbdd6b6cf35e2eb809daafca0bcb7ec47bd685d938477c24cd74c0d6f1c
And you can see your transaction with your transaction hash on Rinkeby Etherscan
Step 4 - Update Contract using Struct
To add a new wave, we only have a message, but we don't know who is waver (sender) and the time of message created.
Instead of saving as a string, we will use Struct to save a message, commenter, and timestamp.
// SPDX-License-Identifier: UNLICENSED

pragma solidity ^0.8.0;

import 'hardhat/console.sol';

contract WavePortal {
    struct Wave {
        address waver;
        string message;
        uint256 timestamp;
    }

    uint256 totalWaves;
    Wave[] private waves;

    constructor() {
        console.log('WavePortal');
    }

    function wave(string memory _message) public {
        totalWaves += 1;

        waves.push(Wave(msg.sender, _message, block.timestamp));
    }

    function getAllWaves() public view returns (Wave[] memory) {
        return waves;
    }

    function getTotalWaves() public view returns (uint256) {
        console.log('We have %d total waves!', totalWaves);
        return totalWaves;
    }
}
For the wave function, we increase totalWaves and then add wave struct into Waves[] array.
msg.senderis the current address that signs a contract (a current user)block.timestapa current timestampblockis global variables, You can read more about it
then update the scripts/run.js
const main = async () => {
  const WavePortal = await hre.ethers.getContractFactory('WavePortal');
  const wavePortal = await WavePortal.deploy();
  await wavePortal.deployed();
  console.log('Contract deployed to:', wavePortal.address);

  const totalWaves = await wavePortal.getTotalWaves();
  console.log('totalWaves : ', totalWaves);

  const waves = await wavePortal.getAllWaves();
  console.log('getAllWaves : ', waves);

  const tx = await wavePortal.wave('Hello World');
  tx.wait();

  // Get all comments after commented.
  const newWaves = await wavePortal.getAllWaves();
  console.log('All waves later ', newWaves);
};

main()
  .then(() => {
    process.exit(0);
  })
  .catch((error) => {
    console.log(error);
    process.exit(1);
  });
Run again and see the result:
npx hardhat run scripts/run.js
You will see the result below:
totalWaves :  BigNumber { value: "0" }
getAllWaves :  []
All waves later  [
  [
    '0xf39Fd6e51aad88F6F4ce6aB8827279cffFb92266',
    'Hello World',
    BigNumber { value: "1646743710" },
    waver: '0xf39Fd6e51aad88F6F4ce6aB8827279cffFb92266',
    message: 'Hello World',
    timestamp: BigNumber { value: "1646743710" }
  ]
]
Step 5 - Create Frontend.
Now, it's time to create a website to interact with smart contracts, add comments, read all comments, and see how many comments (waves).
We use React.js with Vite for tooling, to create simple website with React template
npm create vite@latest wave-portal-frontend -- --template react
Install tailwind inside wave-portal-frontend
cd wave-portal-frontend
npm install -D tailwindcss postcss autoprefixer
npx tailwindcss init -p
Update the paths to template files in tailwind.config.js file.
module.exports = {
  content: ['./index.html', './src/**/*.jsx'],
  theme: {
    extend: {}
  },
  plugins: []
};
Add Tailwind directives in index.css file.
@tailwind base;
@tailwind components;
@tailwind utilities;
Don't forgot to include index.css in Index.jsx file
import './index.css';
Now we can use Vite with Tailwind CSS, run dev server http://localhost:3000
npm install
npm run dev
Finally, we use date-fns to format our timestamp.
npm install date-fns
We use useState to save state for
[wave, setWave]- retrieve a total wave and set a total wave.[waves, setWaves]- list all waves and set waves.[account, setAcdount]- get current wallet account.
The final App,jsx will be:
import React, { useState } from 'react';

import './App.css';

export default function App() {
  const [wave, setWave] = useState(0);
  const [waves, setWaves] = useState([]);
  const [account, setAccount] = useState('');

  const connectWallet = () => {
    // TODO
  };

  return (
    <div className="wave-main">
      <div className="container mx-auto py-24">
        <section className="text-center">
          <h1 className="text-center text-4xl font-extrabold tracking-tight text-slate-900 sm:text-5xl lg:text-6xl">
            👋 Hey there!
          </h1>

          <p className="mx-auto mt-6 mb-24 max-w-3xl text-lg">
            I am{' '}
            <a href="https://twitter.com/Phonbopit" className="text-sky-600" target="_blank">
              Chai Phonbopit
            </a>{' '}
            from Thailand 🇹🇭
          </p>

          <div className="inset-x-0 mb-16 flex justify-center pt-8">
            <button
              className="flex h-12 w-full items-center justify-center rounded-lg bg-slate-800 px-6 font-semibold text-white hover:bg-slate-600 sm:w-auto"
              onClick={connectWallet}
            >
              Connect Wallet
            </button>
          </div>
        </section>

        <div className="mt-16 grid place-items-center">
          <h1 className="bg-gradient-to-r from-cyan-400 to-blue-500 bg-clip-text text-2xl font-extrabold text-transparent">
            We have <span className="text-4xl">{wave}</span>
            {` `} waves and counting...
          </h1>
        </div>

        <div className="flex flex-col items-center justify-center">{waves.map(() => {})}</div>
      </div>
    </div>
  );
}
Step 7 - Connect your wallet
Now, time to connect a wallet. We will use 2 function:
checkIfWalletIsConnected: Check if metamask installed or already connected by usinguseEffect()connectWallet: a function to connect wallet.
export default function App() {
  const [wave, setWave] = useState(0);
  const [waves, setWaves] = useState([]);
  const [account, setAccount] = useState('');

  const checkIfWalletIsConnected = () => {
    /*
     * First, make sure we have access to window.ethereum
     */
    const { ethereum } = window;

    if (!ethereum) {
      console.log('Make sure you have metamask!');
    } else {
      console.log('We have the ethereum object', ethereum);
    }
  };

  const connectWallet = async () => {
    try {
      const { ethereum } = window;

      if (!ethereum) {
        alert('Please install metamask');
        return;
      }

      if (account) {
        return;
      }

      const accounts = await ethereum.request({
        method: 'eth_requestAccounts'
      });
      setAccount(accounts[0]);
      console.log('set accounts', accounts);
      checkIfWalletIsConnected(); // initial the waves data.
    } catch (error) {
      console.log(error);
    }
  };

  useEffect(() => checkIfWalletIsConnected(), []);

  return (
    ...
  )
}
Now we have a website with a button to connect a wallet (when we click a button, a metamask popup will open). If you have metamask installed, you can see the Console.


Step 8 - Call Smart Contract on Frontend.
To call a smart contract function on the frontend, We need contract address and contract ABI,
the syntax is:
const { ethereum } = window;

const provider = new ethers.providers.Web3Provider(ethereum);
const signer = provider.getSigner();
const wavePortalContract = new ethers.Contract(contractAddress, contractABI, signer);
contractAddress- A contract address that we already deployed.contractABI- JSON file insideartifacts/contract/WavePortal.jsonsigner- A signer, use to confirm transction (Metamask)
Then just create utils/WavePortal.json and copy the contents from artifacts/contract/WavePortal.json and create new file under utils folder, then a file named WavePortal.json
The final code looks like this:
import abi from './utils/WavePortal.json';

const contractAddress = 'YOUR_CONTRACT_ADDRESS';
const contractABI = abi.abi;

const { ethereum } = window;

const provider = new ethers.providers.Web3Provider(ethereum);
const signer = provider.getSigner();
const wavePortalContract = new ethers.Contract(contractAddress, contractABI, signer);
Then call getTotalWaves in the frontend and set with setWave() to update our frontend.
const getTotalWaves = async () => {
  const { ethereum } = window;

  if (ethereum) {
    const provider = new ethers.providers.Web3Provider(ethereum);
    const signer = provider.getSigner();
    const wavePortalContract = new ethers.Contract(contractAddress, contractABI, signer);

    let count = await wavePortalContract.getTotalWaves();
    console.log('total count', count.toNumber());
    setCount(count.toNumber());
  }
};
for new wave we create a function wave to sumbit a transaction:
const wave = async () => {
  try {
    const { ethereum } = window;

    if (ethereum) {
      const provider = new ethers.providers.Web3Provider(ethereum);
      const signer = provider.getSigner();
      const wavePortalContract = new ethers.Contract(contractAddress, contractABI, signer);

      let count = await wavePortalContract.getTotalWaves();
      console.log('Retrieved total wave count...', count.toNumber());

      /*
       * Execute the actual wave from your smart contract
       */
      const waveTxn = await wavePortalContract.wave();
      console.log('Mining...', waveTxn.hash);

      await waveTxn.wait();
      console.log('Mined -- ', waveTxn.hash);

      count = await wavePortalContract.getTotalWaves();
      console.log('Retrieved total wave count...', count.toNumber());
    } else {
      console.log("Ethereum object doesn't exist!");
    }
  } catch (error) {
    console.log(error);
  }
};
and the last, getAllWaves to display all waves,
const FORMAT_DATE = 'dd MMM yyyy HH:mm:ss';

const sortingWaves = (allWaves) => {
  let waves = allWaves.map((wave) => ({
    address: wave.waver,
    message: wave.message,
    timestamp: wave.timestamp,
    createdAt: format(new Date(wave.timestamp * 1000), FORMAT_DATE)
  }));

  let sortedWaves = waves.sort((a, b) => b.timestamp - a.timestamp);
  console.log('sortedWaves => ', sortedWaves);
  return sortedWaves;
};

const getAllWaves = async () => {
  try {
    const { ethereum } = window;

    if (ethereum) {
      const provider = new ethers.providers.Web3Provider(ethereum);
      const signer = provider.getSigner();
      const wavePortalContract = new ethers.Contract(contractAddress, contractABI, signer);

      const allWaves = await wavePortalContract.getAllWaves();
      let sortedWaves = sortingWaves(allWaves);
      setWaves(sortedWaves);
    }
  } catch (error) {
    console.log(error);
  }
};
You can read more about sort here : Javascript: Array.prototype.sort()
Step 10 - Event
Events in solidity are ways to communicate with a client appliation or website.
To declare a new event:
event NewWave {
    address indexed from,
    string message,
    uint256 timestamp
}
and then to emit the event:
function wave(string memory _mesasge) public {
  // some code..

  emit NewWave(msg.sender, _message, block.timestamp);
}
This way, we can show an alert message on the frontend website like when someone commented (create a new wave).
Update our frontend to handling new wave, we just have a function to update the new wave to the list of waves with setWaves() function:
const handleOnNewWave = (address, message, timestamp) => {
  console.log('NewWave :', address, message, timestamp);

  const newWave = {
    address,
    message,
    timestamp,
    createdAt: format(new Date(timestamp * 1000), FORMAT_DATE)
  };

  console.log('handleNewWave > ', newWave);

  setWaves((prevState) => {
    let newAllWaves = [...prevState, newWave].sort(
      (a, b) => b.timestamp - a.timestamp
    );
    return newAllWaves;
  });
};

const getAllWaves = async () => {
    try {
      const { ethereum } = window;

      if (ethereum) {
        const provider = new ethers.providers.Web3Provider(ethereum);
        const signer = provider.getSigner();
        const wavePortalContract = new ethers.Contract(
          contractAddress,
          contractABI,
          signer
        );

        const allWaves = await wavePortalContract.getAllWaves();
        let sortedWaves = sortingWaves(allWaves);
        setWaves(sortedWaves);

        // event lisenter from Contract#Event
+        wavePortalContract.on('NewWave', handleOnNewWave);
      }
    } catch (error) {
      console.log(error);
    }
  };
🎉🎉🎉 Congratulations on finishing this tutorial!
The source code : Link
Improvements
There are so many things to improve, for example:
- Handle network changes on Metamask or allow user to add a custom network.
- Use React.Context for handle
ethers.Contract()only one place. - Add Loading state, update UI to show content before and after connected wallet.
- Use
useDapplibrary or another wallet provider.
I have some resources that I currently use to learn Solidity and hope that you might find useful on your journey.
- Ethereum Developer Resources
- Buildspace - Solidity
- Pointer.gg - Solid Solidity
- Web3 University
- useWeb3
- Solidity, Blockchain, and Smart Contract Full Course – Beginner to Expert Python Edition
- The Complete Guide to Full Stack Ethereum Development
- FullStack Web3 — Everything You Need to Know
- Complete Web3.0 And Solidity Development Roadmap 2022
Happy Coding ❤️
- Authors
- Name
- Chai Phonbopit
- @Phonbopit

